Introduction
Regular maintenance of your EV charger is essential to keep charging reliable, safe, and efficient. Whether you own a residential Level 2 charger or manage multiple commercial units, a monthly inspection can catch small issues before they become costly or dangerous. This maintenance checklist outlines what to inspect every month, how to spot common problems, and when to call a professional.
Why Monthly EV Charger Maintenance Matters
Monthly inspections preserve the longevity of your electric vehicle charger, reduce downtime, and prevent safety hazards such as electrical faults, overheating, or water ingress. Consistent checks ensure optimal charging performance, protect warranty coverage for some manufacturers, and maintain compliance with workplace or building safety policies.
Safety First: Precautions Before You Inspect
Before you begin any visual or simple functional checks, follow these safety precautions:
- Turn off power to the charging unit when performing any hands-on electrical checks, unless the inspection is strictly visual or involves a live-operation test that you are trained to perform.
- Use personal protective equipment such as insulated gloves and safety glasses if you will touch electrical components.
- Follow manufacturer instructions for your specific EV charger model. Some tasks should only be performed by qualified technicians.
Monthly EV Charger Maintenance Checklist
Use the following checklist each month to keep your electric vehicle charger functioning well. Mark items as OK, Needs Attention, or Repaired/Completed to build a maintenance record.
1. Visual Inspection of the Charger Unit
- Check the enclosure for cracks, dents, rust, or signs of water intrusion. Corrosion or gaps can allow moisture that damages electronics.
- Inspect seals and gaskets to ensure they are intact and compress properly.
- Look for any scorch marks, discoloration, or melting around vents and connectors that could indicate overheating.
2. Cable and Connector Checks
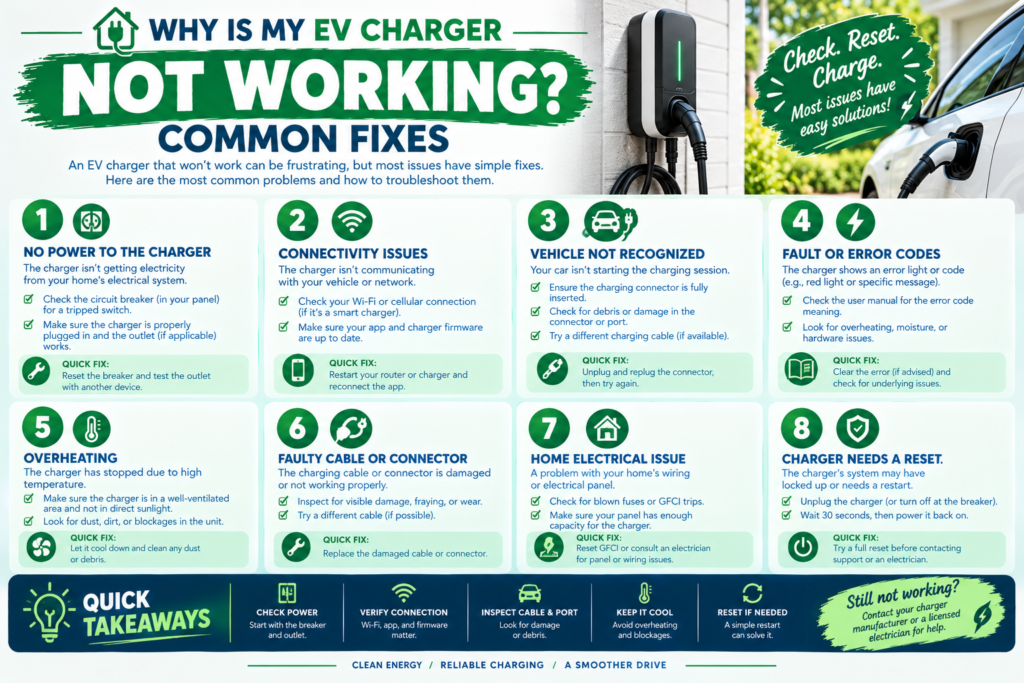
- Examine the charging cable for cuts, abrasions, kinks, or exposed conductor. Damaged cables should be removed from service immediately.
- Inspect the plug and connector pins for corrosion, bent pins, or foreign objects. Clean contacts with an approved, non-abrasive contact cleaner if necessary.
- Test the cable strain relief and handle for secure attachment and wear. Loose strain relief can cause internal wire damage.
3. Mounting, Pedestal, and Enclosure Hardware
- Ensure the charger is firmly mounted and that brackets, bolts, and anchors are secure. Loose mounts can stress internal wiring and connectors.
- Inspect any pedestal or housing for stability and signs of tampering or vandalism.
4. Electrical and Functional Tests
- Run a test charge cycle to confirm the charger connects, initiates charging, and stops correctly when the vehicle is full or disconnected.
- Verify that status lights, displays, and indicator LEDs function properly and show normal operating status.
- Check for unusual noises during operation such as buzzing or humming, which can indicate loose components or electrical issues.
5. Grounding and Bonding
- Confirm grounding connections are secure and free from corrosion.
- Look for evidence of ground-fault or residual current device tripping. Persistent tripping warrants immediate investigation by a licensed electrician.
6. Network, Software, and Communication
- Check that the charger is connected to the network (if applicable) and communicating with management software or cloud services.
- Confirm firmware is up to date according to the manufacturer’s recommendations. Software updates can address bugs and security vulnerabilities.
- Review charging logs for anomalies such as frequent disconnects, unusual session durations, or error codes.
7. Cleanliness and Environmental Considerations
- Remove dust, insect nests, leaves, or debris from vents and around the unit to maintain proper airflow and prevent overheating.
- Keep the area around the charger clear to prevent trip hazards and to provide safe access for users.
- If the charger is outdoors, check drainage and seals to ensure protection against rain and snow.
8. Signage, Labels, and Instructions
- Ensure instructional labels and safety stickers remain legible and firmly adhered. Replace faded or missing signage.
- Verify emergency shutdown instructions are accessible and visible.
When to Call a Licensed Electrician or Manufacturer Support
Certain issues require a professional. Contact a licensed electrician or the charger manufacturer if you observe:
- Sparking, burning smells, or smoke from the charger.
- Repeated ground-fault or breaker trips.
- Visible damage to cables, connectors, or the internal enclosure.
- Persistent communication failures that firmware updates don’t fix.
Preventative Tips to Reduce Maintenance Needs
- Schedule basic checks monthly and deeper inspections annually by qualified technicians.
- Use protective covers or enclosures in harsh climates to reduce exposure to sun, salt spray, or heavy moisture.
- Train users on proper cable handling to minimize wear and avoid yanking or wrapping cables tightly around hooks.
Conclusion
Monthly EV charger maintenance is a simple habit that pays off with improved reliability, safety, and lifespan of your charging equipment. Use this checklist each month to catch issues early, maintain warranty compliance, and ensure a consistent charging experience for EV drivers. When in doubt, document the issue and contact a licensed electrician or the charger manufacturer for professional assessment and repair.
Keeping your EV charger in top condition protects your vehicle, your property, and your investment — a small monthly effort for long-term peace of mind.